SKU Manager Ai Analysis – Getting Started Guide
SKU Manager Setup Guide v1.5
Advanced AI-Powered eBay Listing Analysis Tool
Table of Contents
- Understanding the Complete Process ==NEW SECTION v1.4==
- Creating Your Prompt and Display Template ==REORGANIZED v1.4==
- Setting Up AI Columns (Optional Advanced Feature) ==MOVED AFTER PROMPT v1.4==
- Submitting Feedback and Using Traces ==NEW SECTION v1.5==
Overview
SKU Manager (External Data panel) is an enterprise-level feature that leverages AI to analyze eBay listings in real-time against your custom business criteria. This powerful tool evaluates products, extracts information, and provides instant analysis through display templates and optionally through custom columns.
Key Use Cases
- Phone Analysis: Determine return eligibility and identify high-quality end-user devices
- Inventory Matching: Compare listings against your internal product database
- Model Extraction: Identify product models from titles, descriptions, and images
- Quality Assessment: AI-powered analysis of product condition from images and descriptions
- Automated Decision Making: Get instant buy/pass recommendations
==Understanding the Complete Process== (NEW SECTION v1.4)
What You’re Building
==HIGHLIGHTED: Added comprehensive overview before diving into setup==
Before we dive into configuration, let’s understand what you’re creating. To have AI analysis on your eBay results, you need to set up several components that work together:
- Fields to Send – Select which eBay data gets sent to the AI
- AI Provider – Configure which AI service analyzes your data
- Prompt & Display Template – Instructions for AI and how to display results
- Filter – Triggers the analysis for specific searches
- AI Columns (Optional) – Quick decision fields in your results grid
The Data Flow
eBay Listing → Fields to Send → AI Prompt → JSON Response → Display Template/Columns → Your Analysis
Your Implementation Path
==HIGHLIGHTED: Clear step-by-step path==
Here’s what you’ll be doing:
- Configure which fields to send from eBay listings to the AI
- Set up your AI provider (Gemini or OpenAI) with API key
- Generate a prompt and display template using our project knowledge in Claude/OpenAI
- Configure these in SKU Manager as profiles
- Create a filter that triggers the analysis
- Optionally add AI columns for quick grid-based decisions
💡 Important Mindset: Your goal initially is not perfection – it’s to get a working round-trip of data flowing through the system. Start simple, get it working, then iterate and improve.
Output Options
You have two ways to see AI analysis results:
Display Templates (Start Here)

- Shows detailed analysis in the External Panel
- Full HTML formatting with comprehensive insights
- Best for getting started and understanding your data
AI Columns (Add Later)

- Shows quick decisions directly in results grid
- Simple Yes/No or High/Low values
- Best added after your prompt is working well
Prerequisites
System Requirements
- License: Enterprise license required
- Status: Must be whitelisted for SKU Manager access
- Browser: Google Chrome will be installed through the application
- Python: Will be installed through the application
- Need an OpenAI (ChatGPT) or Gemini API key for Ai Analysis of listing data
- A Claude Ai account or OpenAi (ChatGPT) for creating and updating prompts & display template.
Getting Whitelisted
- Navigate to Menu > Help > Subscription Info
- Copy your License Key
- Submit via Live Support on uBuyFirst website
- Agree to Terms and Conditions
- Wait for confirmation of whitelist status
Initial Setup
Step 1: Access External Data Panel

- Open uBuyFirst application
- Navigate to Data tab > Get Data (External Data)
- The External Data panel will open
Step 2: Python Installation
- Click “Install Python” button (top right)
- Follow installation prompts
- After installation completes, click “Setup Python libraries”
- Command prompt will open – follow instructions until completion
Step 3: Enable External Data
- Check ✅ “External Data Enabled”
- Check ✅ “Show results first, do not wait for AI” (recommended)
- Select AI ✅ for the radio button for the Type
AI Provider Setup
==HIGHLIGHTED: Moved earlier in the flow==
Before creating your prompt, you need to obtain and configure your AI provider:
Step 1: Choose and Configure Provider

In the AI Prompt tab: (create new or edit the default)
- Select Provider:****
- Gemini (recommended for cost-effectiveness)
- OpenAI (for advanced analysis)
- Gemini (recommended for cost-effectiveness)
- OpenAI (for advanced analysis)
- Get API Key:****
- For Gemini: Visit Google AI Studio
- For OpenAI: Visit OpenAI Platform
- Generate API key and ensure billing is active
- For Gemini: Visit Google AI Studio
- For OpenAI: Visit OpenAI Platform
- Generate API key and ensure billing is active
- Configure in SKU Manager:****
- Select provider from dropdown
- Paste API key
- Select model:
- Gemini: gemini-2.5-flash
- OpenAI: gpt-4.0 or gpt-4.0-mini
- Select provider from dropdown
- Paste API key
- Select model:
- Gemini: gemini-2.5-flash
- OpenAI: gpt-4.0 or gpt-4.0-mini
- Gemini: gemini-2.5-flash
- OpenAI: gpt-4.0 or gpt-4.0-mini
Fields to Send Configuration
==HIGHLIGHTED: Added context about what this step does==
Understanding This Step
You’re now selecting which eBay listing data gets sent to your AI for analysis. Think of this as choosing what information the AI will have available to make decisions.

Prerequisites (If Using Category-Specific Fields)
To access category-specific fields:
- Go to Grid tab > Item Specifics
- Select your category or enter Category ID
- Click “Find items specifics”
- Select desired columns and click “Create columns”
Create Your Fields Profile
- Click “AI Fields To Send” tab in External Data panel
- Click “Add” to create new profile
- Name descriptively (e.g., “Phone_Analysis_Fields”)
- Select Standard Fields (left column): Essential fields:
- ✅ Alias
- ✅ Brand
- ✅ Condition
- ✅ Condition Description
- ✅ Total Price
- ✅ Title
- ✅ Returns
- ✅ Alias
- ✅ Brand
- ✅ Condition
- ✅ Condition Description
- ✅ Total Price
- ✅ Title
- ✅ Returns
- Note: Description and All Photos are sent automatically
- Select Category-Specific Fields (right column) if needed
- Click Save****
==Creating Your Prompt and Display Template== (REORGANIZED v1.4)
==HIGHLIGHTED: Major new section on using Claude/OpenAI projects==
Understanding Prompt and Template Creation
You’ll be creating two interconnected components using Ai externally using:
– ChatGPT Custom GPT (Files already uploaded)
– Claude Project – (Need to download project instructions and upload to project)
You will be creating:
- Prompt: Instructions telling the AI how to analyze listings
- Display Template: HTML that formats the AI’s response for viewing
These work together – the prompt generates data that the template displays. You’ll create both simultaneously using an AI assistant (Claude or OpenAI).
Step 1: Download Project Knowledge
- Get the SKU Manager Project Package (link provided by support)
- Unzip the package – it contains:
- Documentation files explaining SKU Manager
- Working examples (like Phone Analysis)
- Template patterns and best practices
- System requirements and formatting rules
- Documentation files explaining SKU Manager
- Working examples (like Phone Analysis)
- Template patterns and best practices
- System requirements and formatting rules
Step 2: Set Up Your AI Project
==HIGHLIGHTED: Critical new process==
Using Claude (Recommended for Advanced Users):
- Go to Claude.ai
- Click “Projects” in sidebar
- Click “Create Project”
- Name it “SKU Manager Assistant”
- Click + and add project files
- Locate the “Project Knowledge Instructions” file and add to Instructions area.
- Upload ALL files from the unzipped package
- Start by creating a chat “I want to create a new prompt & display template”
- Recommended – Enable extended thinking + model 4.1
Using Our OpenAi Custom GPT: (Recommended for Quick Start)
- Create a new Project
- Add all documentation files to project knowledge
- Configure project instructions
Step 3: Generate Your Initial Prompt and Template
==HIGHLIGHTED: New conversation approach==
In your AI project, start a new conversation:
I’m a professional buyer in [YOUR INDUSTRY] and I want to create a
prompt and display template for analyzing [PRODUCT TYPE] on eBay.
Most important to me:
– [Key factor 1, e.g., detecting defects]
– [Key factor 2, e.g., identifying models]
– [Key factor 3, e.g., assessing condition]
I want to start simple just to get it working. Can you help me create
both the prompt and display template?
The AI will:
- Ask clarifying questions about your needs
- Generate a prompt with proper JSON structure
- Create a matching HTML display template
- Ensure both work together correctly
Step 4: Keep It Simple First
==HIGHLIGHTED: Iterative approach emphasis==
For your first attempt, focus on basics:
Example for phones:
- Detect visible defects (cracks, damage)
- Identify lock status (iCloud, carrier)
- Check for functional issues mentioned
- Note included accessories
- Assess battery health if shown
Don’t try to build everything at once. Get basic analysis working, then add complexity.
The AI will output you a prompt/display template.
Step 5: Load Your Prompt and Template into SKU Manager
Loading the Prompt:

- Copy the generated prompt from your AI conversation
- In SKU Manager, go to “AI Prompt” tab
- Click “Add” to create new profile
- Name it clearly (e.g., “Phone_Analysis_Prompt_v1”)
- Paste the prompt
- Save
Loading the Display Template:

- Copy the generated HTML template
- Go to “AI Display Template” tab
- Click “Add” to create new profile
- Name it (e.g., “Phone_Display_Template_v1”)
- Paste the template
- Verify preview looks correct
- Save
Step 6: Understanding the Connection
==HIGHLIGHTED: How prompt and template work together==
Your prompt outputs JSON data like:
{
“defectsFound”: [“screen crack”, “battery weak”],
“modelIdentified”: “iPhone 13 Pro”,
“overallCondition”: “Fair”
}
Your template displays it using placeholders:
<div>Model: {{modelIdentified}}</div>
<div>Condition: {{overallCondition}}</div>
The AI project helps ensure these match correctly.
Step 7: Iterating and Improving
Once working, you can refine in your AI project using feedback submissions from the app or by talking to the Ai in natural language about the changes & improvements you wish to make for both the prompt and display template.
- “The display looks cluttered, can we reorganize it?”
- “I need to add detection for [specific issue]”
- “Can we make the condition assessment more detailed?”
The AI will tell you whether to update the prompt, template, or both.
==Setting Up AI Columns (Optional Advanced Feature)== (MOVED AFTER PROMPT v1.4)
==HIGHLIGHTED: Now positioned as optional after getting basics working==
When to Add AI Columns
Add AI Columns AFTER you have:
- ✅ A working prompt returning good analysis
- ✅ Display template showing results correctly
- ✅ Tested with 10+ listings successfully
- ✅ Identified key decisions you make repeatedly
AI Columns add quick decision fields to your results grid. They’re powerful but add complexity, so get the basics working first.
What Are AI Columns?
Custom fields that appear in your results grid for:
- Quick Yes/No decisions
- Sorting and filtering results
- Bulk selection of items
- Visual scanning without opening details
Creating AI Columns
Step 1: Modify Your Prompt
Go back to your AI project conversation:
My prompt is working well. Now I want to add AI Columns for quick decisions
in the grid. I need:
- “Can Return” column (Yes/No/Unknown)
- “Original Owner” column (High/Medium/Low/Unknown)
Can you update my prompt to output these as separate fields with exact values?
Step 2: Create Column Profile

- Click “AI Columns” tab
- Click “Add” to create profile
- Name it (e.g., “Phone_Analysis_Columns”)
- CRITICAL: Enter each column on a SEPARATE LINE:
Can Return
Original Owner
- Press ENTER after each column name
- Check ✅ “Return Original” (recommended)
- Save
Step 3: Update Your Prompt
Replace your existing prompt with the updated version that includes:
AI COLUMN CONFIGURATION
1. “Can Return” Field – For AI Column
Must return EXACTLY: “Yes”, “No”, or “Unknown”
2. “Original Owner” Field – For AI Column
Must return EXACTLY: “High”, “Medium”, “Low”, or “Unknown”
Creating the Trigger Filter
==HIGHLIGHTED: Clearer explanation of filter’s role==
Understanding Filters
The filter is what ties everything together. It watches for specific eBay searches and triggers your AI analysis using the profiles you’ve created.
Create Your Filter
- Close External Data panel (changes must take effect)
- Navigate to Home > Filters
- Click “New”
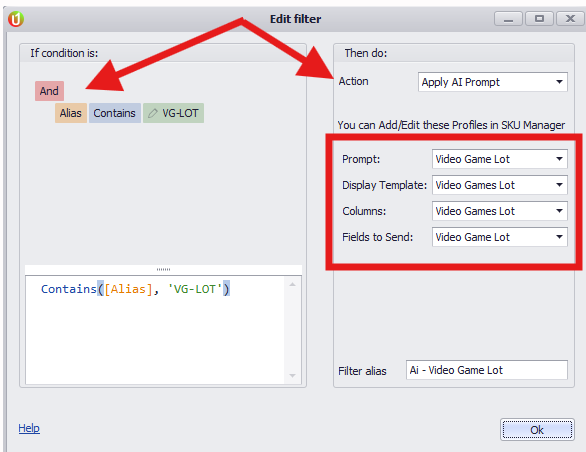
- Set up the trigger condition:
- Field: Choose what to monitor (e.g., [Alias], [Title])
- Operator: How to match (contains, equals, etc.)
- Value: What to look for (e.g., “i11” for iPhone 11)
- Field: Choose what to monitor (e.g., [Alias], [Title])
- Operator: How to match (contains, equals, etc.)
- Value: What to look for (e.g., “i11” for iPhone 11)
- Action: Select “Apply AI Prompt”
- Connect your profiles:
- Prompt: Your prompt profile
- Display Template: Your template profile
- Columns: Your columns profile (if created)
- Fields to Send: Your fields profile
- Prompt: Your prompt profile
- Display Template: Your template profile
- Columns: Your columns profile (if created)
- Fields to Send: Your fields profile
- Name your filter descriptively
- Enable the filter (check the checkbox)
- Click OK to save
Testing Your Configuration
Initial Test
- Open External Data panel (View > External Panel)
- Click “Stop Script” then “Script Started!” (turns green)
- Verify “Server Status: Running”
- Search for items matching your filter
- Wait a few seconds for AI processing
Success Indicators
✅ Working Correctly:
- External Panel shows formatted analysis
- No error messages
- API dashboard shows successful calls
- (If using columns) Grid shows AI columns with values
❌ Need Troubleshooting:
- Blank external panel
- Error messages
- No API activity
- Empty column values
Iterative Improvement
- Test with 10-20 listings
- Note what’s working and what’s not
- Return to your AI project conversation
- Request specific improvements
- Update prompt/template in SKU Manager
- Test again
==Submitting Feedback and Using Traces== (NEW SECTION v1.5)
When your AI analysis produces incorrect results, SKU Manager’s feedback system helps you capture exactly what went wrong and fix it efficiently.
What Is a Trace?
A trace is a complete snapshot of an AI analysis captured when you submit feedback. It contains everything needed to diagnose and fix prompt issues:
- All the eBay listing data that was sent to the AI
- The exact prompt that was triggered
- The AI’s complete response
- The images that were analyzed
- Your feedback about what went wrong
When to Submit Feedback
Submit feedback when:
- ❌ AI calculated something incorrectly (wrong price, wrong quantity)
- ❌ AI identified the wrong product or model
- ❌ AI missed information that was clearly visible
- ❌ Display shows data incorrectly
- ❌ AI made a wrong decision (said “BUY” when it should be “PASS”)
How to Submit Feedback
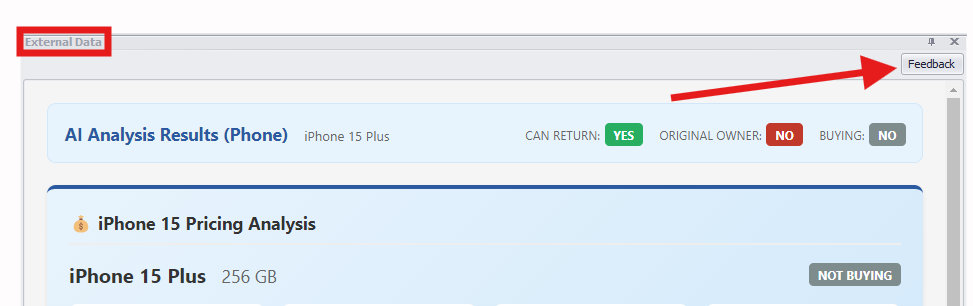
- Select the listing you wish to leave feedback on from results grid with Ai Analysis displaying
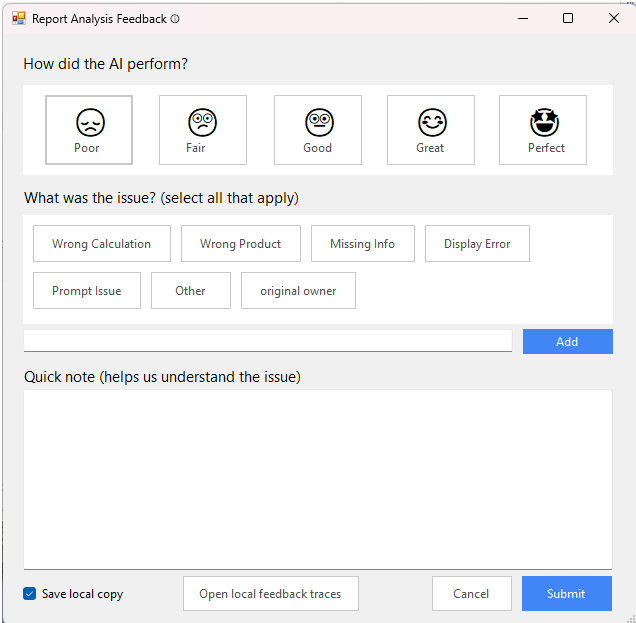
- Click the feedback button (thumbs down or feedback icon)
- Rate the severity (1-5 stars)
- Select the issue type:
- Wrong Calculation – Math/pricing errors
- Wrong Product – Misidentified the item
- Missing Info – AI didn’t extract available data
- Display Error – Template formatting problem
- Prompt Issue – Logic/decision errors
- Other – Anything else
- Wrong Calculation – Math/pricing errors
- Wrong Product – Misidentified the item
- Missing Info – AI didn’t extract available data
- Display Error – Template formatting problem
- Prompt Issue – Logic/decision errors
- Other – Anything else
- Write a note explaining:
- What the AI got wrong
- What the correct answer should be
- Where the correct information was (title, description, images)
- What the AI got wrong
- What the correct answer should be
- Where the correct information was (title, description, images)
- Submit – This creates a trace file package
Trace Files Reference
When you submit feedback, SKU Manager creates these files:
File | What It Contains |
|---|---|
AI_Payload.txt | All eBay listing fields sent to AI |
AI_Description.txt | Raw listing description text |
AI_SystemPrompt.txt | The full prompt that was triggered |
AI_ResponseHtml.html | Complete rendered output |
AI_DisplayTemplate.txt | HTML template used |
AI_Feedback.txt | Your rating, issue tags, and notes |
AI_ProfileAndUrl.txt | Active profiles + image URLs |
Image_1.jpg through Image_N.jpg | Downloaded listing images |
Using Traces to Fix Your Prompt
Step 1: Locate Your Feedback TraceCan access via feedback menu

Or access via C:\Users\USERNAME\AppData\Roaming\uBuyFirst\SKUManagerScripts\AiFeedback\LicenseKey\
After submitting feedback, locate the trace files (typically saved in your SKU Manager data folder or exportable from the feedback panel).
Step 2: Bring to Your AI Project
Go to your Claude/OpenAI project and start a new conversation:
I have a trace from SKU Manager showing an AI analysis error.
I’m going to upload the trace files so you can help me fix my prompt.
Upload the relevant trace files (at minimum: AI_Feedback.txt, AI_SystemPrompt.txt, AI_Payload.txt, and any images if relevant).
Step 3: Let the AI Analyze
Your AI assistant will:
- Summarize what it received
- Identify which section of your prompt caused the issue
- Verify whether the data was available to the AI
- Propose a targeted fix (not a full rewrite)
Step 4: Review the Suggested Fix
The AI will show you:
- BEFORE: The problematic section of your prompt
- AFTER: The corrected version
- WHY: Explanation of how this fixes the issue
Example:
Issue Found: Original Owner detection only checks title, not description.
BEFORE (your prompt, line ~45):
“Very High” – Look for “my phone” in title
AFTER (suggested fix):
“Very High” – Look for “my phone” in title AND description
Why: Seller stated “this was my personal phone” in description,
but prompt only checked title.
Step 5: Apply and Test
- Get the complete updated prompt from your AI assistant
- Update your prompt profile in SKU Manager
- Re-test with the same listing to verify the fix works
- Test with similar listings to ensure no regressions
Common Issue Types and Where to Look
Issue Type | Check This Section in Prompt |
|---|---|
Wrong Calculation | PRICE EVALUATION, math formulas, quantity logic |
Wrong Product | PRODUCT VALIDATION, brand/model detection |
Missing Info | Field extraction rules, image analysis instructions |
Display Error | Display Template (not the prompt) |
Prompt Issue | BUSINESS RULES, decision criteria, thresholds |
Best Practices for Feedback
Do:
- ✅ Be specific about what’s wrong and what’s right
- ✅ Include where the correct information was located
- ✅ Submit feedback for the same issue type multiple times if it recurs
- ✅ Test your fix with the original problematic listing
Don’t:
- ❌ Submit feedback for issues outside the prompt’s scope
- ❌ Expect one fix to solve all problems
- ❌ Skip writing notes – they’re critical for diagnosis
The Improvement Cycle
Run AI Analysis
↓
Issue Found → Submit Feedback → Trace Created
↓
Bring Trace to AI Project
↓
AI Analyzes and Proposes Fix
↓
Apply Fix to SKU Manager
↓
Test Again → Issue Resolved ✓
(or repeat cycle)
Best Practices
Start Simple, Build Gradually
- Begin with basic detection/extraction
- Get round-trip working
- Add complexity incrementally
- Test each addition thoroughly
Use Your AI Project Effectively
- Keep all conversations in the project
- Build on previous context
- Ask for explanations of changes
- Request both prompt and template updates together
Performance Optimization
- Limit initial analysis to essential factors
- Add advanced features only after basics work
- Use AI columns sparingly (5-10 maximum)
- Keep prompts focused and clear
Troubleshooting
Common Issues and Solutions
No results showing:
- Verify filter condition matches test items
- Check all profiles selected in filter
- Ensure “External Data Enabled” is checked
- Confirm script is running (green button)
AI Columns not appearing:
- Verify each column on separate line
- Check prompt includes column configuration
- Ensure columns profile selected in filter
- Restart script after changes
Template showing raw JSON:
- Check template HTML is valid
- Verify placeholder names match prompt output
- Ensure template saved correctly
API errors:
- Verify billing active on API account
- Check API key is correct
- Monitor usage limits
- Test API key in provider dashboard
Support & Resources
Your Resources
- Project Knowledge Package: Contains all documentation and examples for Claude Project
- ChatGPT Custom GPT: Your OpenAI project for generating prompts & display templates
- Trace Processing: Use feedback traces to fix prompt issues (see Section 11)
- Live Support: Available at uBuyFirst.com
- Email: su**@****st.com
Next Steps
- Complete basic setup with simple prompt
- Test with your product category
- Iterate using AI project assistance
- Use feedback/traces to fix issues as they arise
- Add AI columns once comfortable
- Expand analysis sophistication
Version 1.5 – Added Feedback/Trace system documentation For Enterprise License Holders Only Last Updated: December 2025
Version History
Version | Date | Changes |
|---|---|---|
v1.4 | Nov 2024 | Reorganized flow with project-based prompt generation; Added “Understanding the Complete Process” section; Moved AI Columns after prompt creation |
v1.5 | Dec 2025 | Added “Submitting Feedback and Using Traces” section (Section 11) |
Updated on: 26/01/2026
Thank you!